11 KiB
Starting with cursive (3/3)
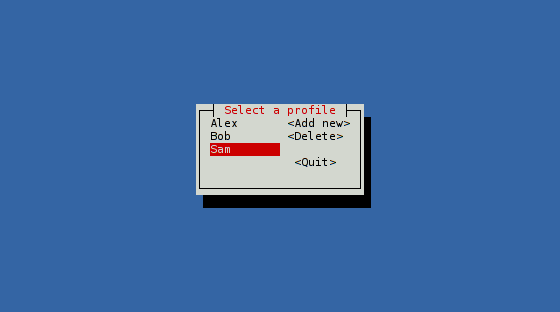
Target goal
In this part, we'll introduce some mutability. Until now, we were adding elements to the UI, and then we'd forget about them. This time, we'll remember them to update them.
Here is the code we'll end up with:
extern crate cursive;

use cursive::Cursive;
use cursive::views::{Button, Dialog, DummyView, EditView,
                     LinearLayout, SelectView};
use cursive::traits::*;

fn main() {
    let mut siv = Cursive::new();

    let select = SelectView::<String>::new()
        .on_submit(on_submit)
        .with_id("select")
        .fixed_size((10, 5));
    let buttons = LinearLayout::vertical()
        .child(Button::new("Add new", add_name))
        .child(Button::new("Delete", delete_name))
        .child(DummyView)
        .child(Button::new("Quit", Cursive::quit));

    siv.add_layer(Dialog::new(LinearLayout::horizontal()
            .child(select)
            .child(DummyView)
            .child(buttons))
        .title("Select a profile"));

    siv.run();
}

fn add_name(s: &mut Cursive) {
    fn ok(s: &mut Cursive, name: &str) {
        s.find_id::<SelectView<String>>("select").unwrap().add_item_str(name);
        s.pop_layer();
    }

    s.add_layer(Dialog::new(EditView::new()
            .on_submit(ok)
            .with_id("name")
            .fixed_width(10))
        .title("Enter a new name")
        .button("Ok", |s| {
            let name =
                s.find_id::<EditView>("name").unwrap().get_content().clone();
            ok(s, &name);
        })
        .button("Cancel", |s| s.pop_layer()));
}

fn delete_name(s: &mut Cursive) {
    match s.find_id::<SelectView<String>>("select").unwrap().selected_id() {
        None => s.add_layer(Dialog::info("No name to remove")),
        Some(focus) => {
            s.find_id::<SelectView<String>>("select")
                .unwrap()
                .remove_item(focus)
        }
    }
}

fn on_submit(s: &mut Cursive, name: &String) {
    s.pop_layer();
    s.add_layer(Dialog::text(format!("Name: {}\nAwesome: yes", name))
        .title(format!("{}'s info", name))
        .button("Quit", Cursive::quit));
}
SelectView
The main element in our application will be a list of names. For this, we'll
use a SelectView. This type is generic on the item stored. We just want
to store the names, so let's build a SelectView<String>:
let select = SelectView::<String>::new();
Our list will start empty. If we leave it like that, it will be tiny when the application starts, and will grow when we add names. This is not very professional-looking, so we'll give it a fixed size.
To do that, a BoxView can wrap any view and give it a fixed size.
We could do:
let select = BoxView::with_fixed_size((10, 5), SelectView::<String>::new());
But there is another shorter way: the Boxable trait is conveniently
implemented for any View, and allow to wrap in a BoxView with a chainable
call. Boxable, and a few other useful traits, are conveniently bundled in
the traits prelude, ready to be imported:
use cursive::traits::*;

let select = SelectView::<String>::new()
    .fixed_size((10, 5));
We'll also want to add a callback when the user chooses a name. The
SelectView::on_submit method takes a callback with a second argument:
the selected item. Since we're using String, our callback will have to be
Fn(&mut Cursive, &String):
let select = SelectView::<String>::new()
    .on_submit(on_submit)
    .fixed_size((10, 5));

fn on_submit(s: &mut Cursive, name: &String) {
    s.pop_layer();
    s.add_layer(Dialog::text(format!("Name: {}\nAwesome: yes", name))
        .title(format!("{}'s info", name))
        .button("Quit", Cursive::quit));
}
(Be sure to call on_submit on the SelectView,
not on the BoxView returned by fixed_size!)
What we do there should be pretty familiar by now: replace the layer with a simple dialog.
Linear layouts
Our main screen is more complex than our previous examples: it is made of
several views. There is a SelectView on the left, and three Buttons to
the right. But our Dialog::new method only takes one view! How will we do?
The solution is to use a layout view to display multiple children side-by-side.
LinearLayout for instance can display views in a line.
We'll use two of them:
- One, set vertically, will hold the buttons on the right.
- Another one, horizontally, will contain the list and the vertical layout.
Let's start with the column of buttons:
let buttons = LinearLayout::vertical()
    .child(Button::new("Add new", add_name))
    .child(Button::new("Delete", delete_name))
    .child(DummyView)
    .child(Button::new("Quit", Cursive::quit));

fn add_name(s: &mut Cursive) {}
fn delete_name(s: &mut Cursive) {}
Buttons here take a regular callback. We're also adding a DummyView here:
this view doesn't do anything, it just occupies a single row - we're using it
as a cheap spacer.
We can now create the second linear layout inside a Dialog:
siv.add_layer(Dialog::new(LinearLayout::horizontal()
        .child(select)
        .child(DummyView)
        .child(buttons))
    .title("Select a profile"));
We've added a DummyView again to add some space between the list and the
buttons. Though with an empty list, it doesn't look like much yet. Let's fill
this list with names!
IDs
When the user presses the <Add new> button, we want to show a popup where he
can enter a new name:
fn add_name(s: &mut Cursive) {
    s.add_layer(Dialog::new(EditView::new()
            .fixed_width(10))
        .title("Enter a new name")
        .button("Ok", |s| {
            // What do we do now?...
        })
        .button("Cancel", |s| s.pop_layer()));
}
We're using EditView here, that we wrap in a fixed width like we did with
the SelectView earlier. We have an <Ok> button, but... what do we do there?
We need to fetch the content of the EditView from the callback, but we don't
have a reference to it. And if you try to declare a variable for the EditView
and use it in the closure, you'll soon be submerged by compiler errors, for
good reasons. But there is a way!
The closure has access to the &mut Cursive, which in turn has access to all
the views, so in theory, we could ask it to borrow the view, if only we knew
how to point to the correct view.
IdView is meant exactly for this: it wraps a view and gives it an ID.
Later, you can ask the Cursive root for this ID and get access to the view.
Just what we need!
Like BoxView, IdView can be used directly with IdView::new, or through
the Identifiable trait. Cursive::find_id can then give you a mutable
reference to the view.
Here's what it looks like in action:
fn add_name(s: &mut Cursive) {
    s.add_layer(Dialog::new(EditView::new()
            .with_id("name")
            .fixed_width(10))
        .title("Enter a new name")
        .button("Ok", |s| {
            let name =
                s.find_id::<EditView>("name").unwrap().get_content().clone();
        })
        .button("Cancel", |s| s.pop_layer()));
}
We create the EditView with the id "name", and we use "name" again when
calling find_id.
Now we just need to do something with this name: add it to the list!
Remember the SelectView we created? Let's give it an ID too:
let select = SelectView::<String>::new()
    .on_submit(on_submit)
    .with_id("select")
    .fixed_size((10, 5));
(Here again, the order is important: we want to wrap the SelectView, not
the BoxView. But we still need to call on_submit before that.)
That way, we can update it with a new item:
fn add_name(s: &mut Cursive) {
    fn ok(s: &mut Cursive, name: &str) {
        s.find_id::<SelectView<String>>("select").unwrap().add_item_str(name);
        s.pop_layer();
    }

    s.add_layer(Dialog::new(EditView::new()
            .on_submit(ok)
            .with_id("name")
            .fixed_width(10))
        .title("Enter a new name")
        .button("Ok", |s| {
            let name =
                s.find_id::<EditView>("name").unwrap().get_content().clone();
            ok(s, &name);
        })
        .button("Cancel", |s| s.pop_layer()));
}
Now that we know how to access the SelectView, removing an item is not very
complicated:
fn delete_name(s: &mut Cursive) {
    match s.find_id::<SelectView<String>>("select").unwrap().selected_id() {
        None => s.add_layer(Dialog::info("No name to remove")),
        Some(focus) => {
            s.find_id::<SelectView<String>>("select")
                .unwrap()
                .remove_item(focus)
        }
    }
}
We use SelectView::selected_id and SelectView::remove_item to remove
the item currently selected, nothing too surprising.
We have to find the SelectView twice, otherwise we're still borrowing s
when we try to add a new layer - one of the quirks of the borrow checker.
Conclusion
This tutorial was a bit larger than the previous ones, so take your time, and don't hesitate to read the documentation.
You've now seen:
- How to wrap views to control their size
- How to assemble views together in a linear layout
- How to give an ID to views and use them later
- How to use
SelectView,EditView,Buttons...