6.2 KiB
Starting with cursive (2/3)
Target goal
This time, we'll work on a slightly bigger example, where the user will need to actually make some choices. Here is what the code will look like:
use cursive::Cursive;
use cursive::views::Dialog;
fn main() {
let mut siv = Cursive::default();
siv.add_layer(Dialog::text("This is a survey!\nPress <Next> when you're ready.")
.title("Important survey")
.button("Next", show_next));
siv.run();
}
fn show_next(s: &mut Cursive) {
s.pop_layer();
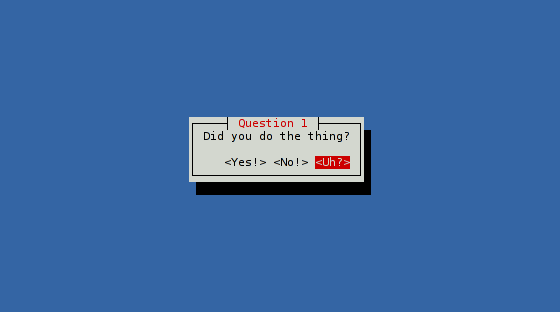
s.add_layer(Dialog::text("Did you do the thing?")
.title("Question 1")
.button("Yes!", |s| show_answer(s, "I knew it! Well done!"))
.button("No!", |s| show_answer(s, "I knew you couldn't be trusted!"))
.button("Uh?", |s| s.add_layer(Dialog::info("Try again!"))));
}
fn show_answer(s: &mut Cursive, msg: &str) {
s.pop_layer();
s.add_layer(Dialog::text(msg)
.title("Results")
.button("Finish", |s| s.quit()));
}
Preparation
This time you're not a beginner anymore, so we'll skip the introduction! Let's start from a basic cursive application:
use cursive::Cursive;

fn main() {
    let mut siv = Cursive::default();

    siv.run();
}
Dialogs
Instead of directly using a TextView, we'll use a Dialog this time.
A dialog is wrapper with a frame around another view, and optionally a title
and/or buttons.
Dialog::around directly takes a view, so we'll directly give it the
TextView:
use cursive::Cursive;
use cursive::views::Dialog;
use cursive::views::TextView;

fn main() {
    let mut siv = Cursive::default();

    siv.add_layer(Dialog::around(TextView::new("...")));

    siv.run();
}
Since creating a Dialog around a TextView is a pretty common task,
Dialog::text is a shortcut function that directly does that. Our line
becomes a little shorter (and we don't need to import
cursive::views::TextView anymore):
siv.add_layer(Dialog::text("..."));
Next, let's add a title. To do that, Dialog has a chainable Dialog::title
method. It takes the dialog by value, and returns it back, making function
chains easy:
siv.add_layer(Dialog::text("...").title("..."));
This way of chaining methods to set-up the view is very common in cursive. Most views provide chainable variants of their methods, to allow creating the view and configuring it in one spot.
Buttons
Our dialog looks better than a TextView alone, but it's still missing some
action. Adding some buttons there will help.
Just like with the title, Dialog has a Dialog::button method to add a
button in a chain. This method takes a label and a callback, the same kind
we saw in the previous tutorial:
siv.add_layer(Dialog::text("...")
    .title("...")
    .button("Quit", |s| s.quit()));
Only this time, we don't want to exit the application right away. Instead of packing everything into the closure, let's use a separate function for the callback. Here's the current state:
use cursive::Cursive;
use cursive::views::Dialog;

fn main() {
    let mut siv = Cursive::default();

    siv.add_layer(Dialog::text("This is a survey!\nPress <Next> when you're ready.")
        .title("Important survey")
        .button("Next", show_next));

    siv.run();
}

fn show_next(_: &mut Cursive) {
    // Empty for now
}
Layers
After the user presses the <Next> button, we want to hide the current popup
and show a new one instead. We'll use Cursive::pop_layer to do that.
Then, we add a new Dialog, this time with a few more buttons:
fn show_next(s: &mut Cursive) {
    s.pop_layer();
    s.add_layer(Dialog::text("Did you do the thing?")
        .title("Question 1")
        .button("Yes!", |s| ()) //< Do something interesting here...
        .button("No!", |s| ())  //< And here as well...
        .button("Uh?", |s| ()); //< And finally here too.
}
As you see, Dialog::button() can be called several times to add more buttons.
The <Uh?> button will add a new popup, without removing the current one:
it'll act as a dismissable infobox. Dialog::info() is a shortcut to build
such a popup:
fn show_next(s: &mut Cursive) {
    s.pop_layer();
    s.add_layer(Dialog::text("Did you do the thing?")
        .title("Question 1")
        .button("Yes!", |s| ()) //< We'll fill this callback soon,
        .button("No!", |s| ())  //< along with this one.
        .button("Uh?", |s| s.add_layer(Dialog::info("Try again!"))));
}
Finally, let's have the "Yes" and "No" buttons use the same callback method to print a message, but with a different text parameter:
fn show_next(s: &mut Cursive) {
    s.pop_layer();
    s.add_layer(Dialog::text("Did you do the thing?")
        .title("Question 1")
        .button("Yes!", |s| show_answer(s, "I knew it! Well done!"))
        .button("No!", |s| show_answer(s, "I knew you couldn't be trusted!"))
        .button("Uh?", |s| s.add_layer(Dialog::info("Try again!"))));
}

fn show_answer(s: &mut Cursive, msg: &str) {
    s.pop_layer();
    s.add_layer(Dialog::text(msg)
        .title("Results")
        .button("Finish", |s| s.quit()));
}
Here, show_answer() does the same thing: remove the previous layer, and add
a new Dialog instead.
Conclusion
Your code should now look like the one at the top of this guide.
As you've seen, the Dialog view is a nice way to present a TextView, but it
also works with any other content. Actually, most layers you'll add will start with
a Dialog wrapping some other view.